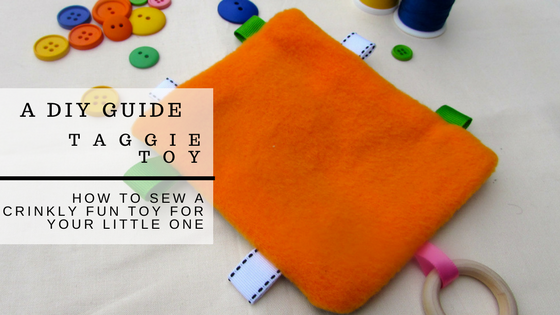
How to Make the Crinkle in Baby Toys
* This post contains chapter links. Your support is appreciated! See my full Disclosure Policy for details.
Seventeen months ago, I became a mommy. For the first time! Now, I had been a step-mom to 4 cute girls for some fourth dimension, but I had withal to have a baby in my household, at least not full-time. As of November 2015, that all changed. My sweetness lilliputian wild man was born… and not only did my life alter, but my crafting changed.
I used to knit shawls, crochet scarves, and hem dresses. Now I knit teddy bears, crochet infant blankets, and sew taggie toys. Most every craft I do or retrieve almost centers around my son.
Unfortunately, every bit a first-time mom, I didn't know ahead of time what my son would want or need. I as well didn't know many of the items could be made right in my craft room for less than buying them in a store. So, I was late on almost everything. I bought when could have made. Or, my son didn't have it at all.
Taggie toys are a big case. I had never seen them. I had never even heard of them. So, my son didn't get one until he was well-nigh 15 months old.
You run into folks, I discovered taggie toys merely a few months ago when nearly all the teeth in my son's mouth decided to come up in all at once. He was in terrible hurting. Desperate to help him, I decided to look for an alternative to baby Tylenol and the frozen teethers he but refused to employ.
I consulted the great and powerful Google and was blessed with about a million pictures of diverse teething toys. Some made of silicon, some in rings, some crocheted, etc… But one picture really defenseless my attention. It was a taggie toy with a wooden teething band. I immediately thought, "DJ would love that!'
As I connected to search I came beyond a package of 10 wooden teething rings on Amazon. It may seem stupid to you, but that's when it striking me. I could make this stuff! I mean, why not? I had a ton of scrap material and ribbon. All I needed were the rings. I fixed that issue with a quick click on the Amazon ad.
A few days later, my son had his first taggie toy and he was happily chomping downwards on the wooden teether. ?
What Are Taggie Toys?
Taggie toys are infant toys that have textured tags placed all over them. If I had to have a guess, I would say that some super mom noticed that no thing what toy she gave her baby, he was most interested in the fiddling tag hanging from it. She ran to her craft room and voilà created the start taggie toy. True or not, whoever did invent them was a genius considering babies do in fact Honey them!
Taggie toys tin can exist fabricated in various sizes and in all sorts of shapes from a basic square, balls, and even animal shapes. They tin as well be made into pillows, blankets, and mats or added to bouncers. Taggie toys sewn with diverse textured materials are great for a infant's sense of touch and some research suggests that information technology stimulates learning.
Regardless, taggie toys seem to soothe and comfort babies, providing them with a sense of safety & security.
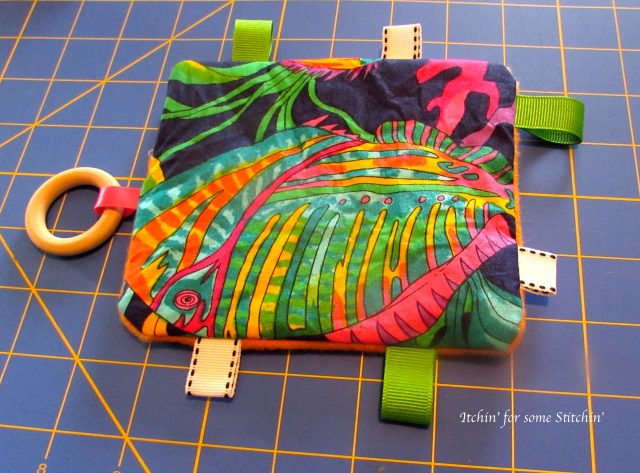
I decided to make mine a cockle taggie toy because I noticed how much my son loves his crinkle soft books. He actually enjoys making noise!
Cost of a DIY Taggie Toy
I've seen taggie toys for sale online from $viii.00 to $35.00, depending on the materials used and the toy'southward creativity. Stuffed taggie toy animals or blocks tend to cost more. Taggie toys with teethers or other added toys will as well exist priced higher.
Regardless, a homemade taggie toy tin be made for cheaper than ownership one from a store, because you can often use bit textile and trimmings that you lot already have. Taggie toys are a dandy bit buster project!
Here'due south a breakdown of how much my taggie toy toll:
- Fabric from a local second-paw shop: $0.50. I just used two squares from the fabric, which was probably about $0.05.
- Three spools of ribbon from Michaels: $3.50. I only used seven two-inch pieces of ribbon. I am guessing this is about $0.10 (or less) worth of textile.
- Organic wooden teething rings from Amazon: $10.00. I bought a set up of ten merely simply used one, so the real toll was $1.00.
- Plastic from a cereal bag: $0.00.
Full materials cost: $14.00.
Total cost of ane taggie toy: about $1.15.
I estimate that, with the materials I had for this project, I could accept fabricated 5-8 taggie toys for under the total materials price of $14.00. All the same, it would have price me about $five.00-8.00 to buy i like it online!
Since I have not seen taggie toys in stores, I cannot speak for in-shop prices. I can only assume that they are similar to online prices. Considering this, it is much more economical to make your own taggie toys than to buy them!
DIY Crinkle Taggie Toy Tutorial
Making taggie babe toys does non need a lot of skill and can be finished in iv easy steps and in about xv minutes.
Step 1 Get together the materials.
The materials needed to make a taggie toy include:
1. Sewing machine/Needle
2. Thread
three. Straight pins
4. Fabric scissors and/or rotary cutter
5. Fabric
- Information technology'southward fine to use the aforementioned cloth for both sides. Yet, I chose a multi-colored printed fabric for 1 side and solid orange soft fleece on the other side, just to increase the number of colors and textures.
- If possible, employ brightly colored fabric or contrasting like blackness and white then that the baby is visually stimulated.
6. Ribbon
- You tin can use whatever ribbon, bias record, lace, etc.. you want. Just brand certain that the cloth doesn't fray.
- I used three different ribbons of varying textures, widths, and colors/patterns because using an assortment of colors and textures for the trimming materials brand the toys more bonny to a infant's sense of touch on.
7. Cockle paper
- I take institute crinkle paper used specifically for taggie toys on Etsy, but I haven't actually bought any, then I tin can't recommend ane detail shop. Just get to Etsy and search for crinkle newspaper. Several shops will popular upward.
- I chose to brand my cockle taggie toy a piddling more than DIY and used a plastic bag from a Nilla Wafer's box. You tin can also use the plastic from a cereal box or a cracker box. It doesn't matter, as long every bit you lot thoroughly clean and dry the plastic earlier use.
- If yous are going to brand taggie toys to sell, I would recommend buying cockle paper. Ultimately, it's just more professional person.
8. Teething rings or other toys (optional)
- I added a wooden teething ring to mine because, for me, the point of the toy was to requite my son something to chew on in hope of soothing his teething troubles.

Step 2 Prepare the materials.
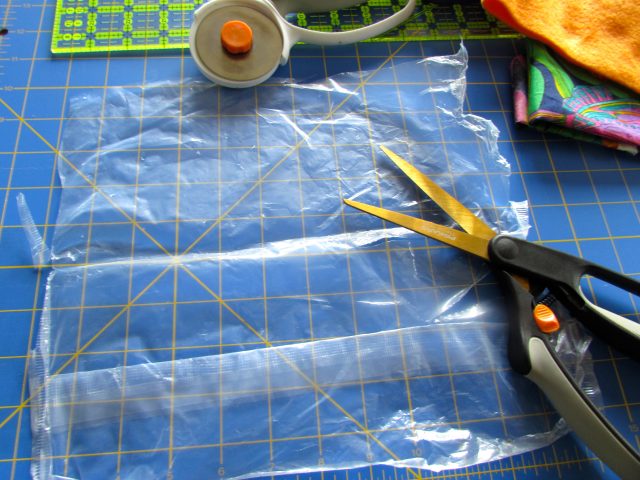
i. Make clean the plastic bag if yous are doing the DIY method.
- Recollect, the purse used to contain food. To foreclose bugs being attracted to the toy, the handbag needs to exist thoroughly washed and dried earlier it is used. Make sure to remove all the crumbs and whatsoever other food rest.
- To do this, use a pair of scissors to gently dissever the handbag along the seams and cut up the side to brand one apartment piece. Wipe the plastic slice make clean using soapy water and a dishcloth/sponge. Rinse it thoroughly and let it air dry or dry out information technology past manus.
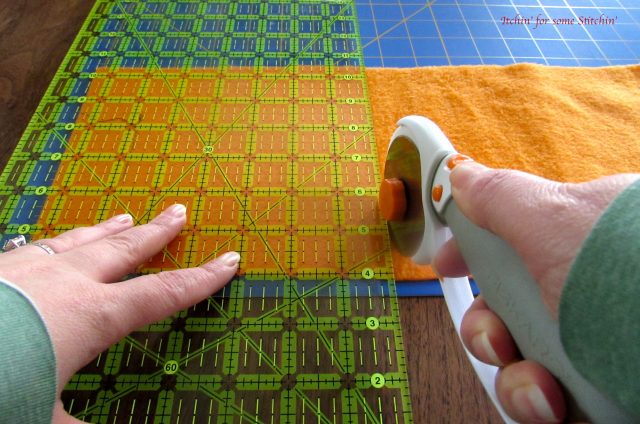
2. Cut the fabric.
-
- Y'all demand to take two pieces of material that are the aforementioned in size and shape. These will form the front end and dorsum of the toy.
- The ideal size is virtually 8×8 inches, but information technology is really upwardly to yous. I actually fabricated mine vii×7 inches considering I used scrap fabric and that's what worked best for the material I had.
- The pieces don't need to be perfect squares, then if your cutting isn't verbal, that's okay. Y'all can fifty-fifty cut the fabric into the shape of an animate being or other objects, every bit long equally information technology does not take long thin areas that would be difficult to turn within out.
3. Cut the washed plastic piece.
-
- Cut your cockle paper to the same dimensions and shape equally your fabric.
- One piece of crinkle paper is plenty, but if you want the toy to be extra crinkly you can employ two pieces.
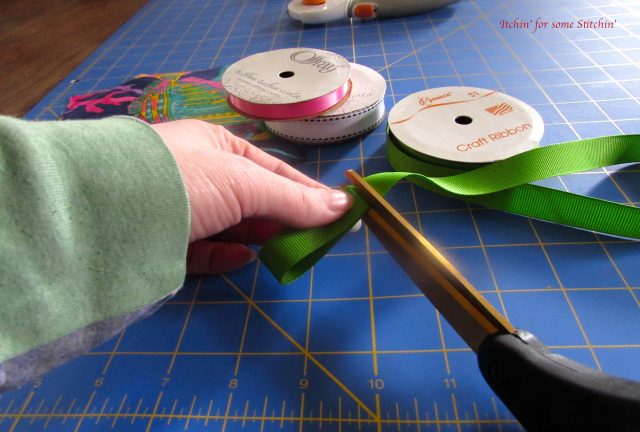
4. Cut & Fold the ribbon.
-
- Decide how many ribbon pieces you desire on the taggie toy. Information technology honestly doesn't matter as long as the ribbons don't interfere with the baby'south ability to play with or recognize the toy.
- Cut the ribbon into 2-3 inch pieces.
- Fold the ribbon pieces in half. These will create small-scale loops along the edge of the toy. I found it helpful to iron my ribbon pieces to assistance them stay folded, merely this isn't necessary.
Step 3 Layer the pieces.
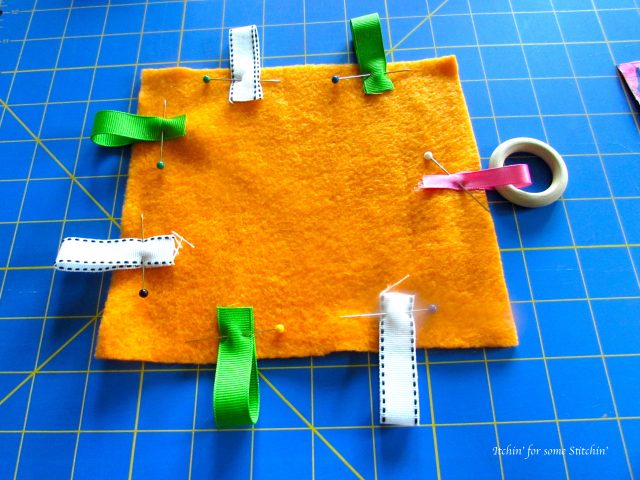
Lay the first piece of fabric on your piece of work surface.If it has a correct and a wrong side, make sure you put the right side up. I started with the orangish fleece, which is the aforementioned on both sides, and so I didn't have this consequence.
Arrange the ribbon pieces effectually the edges. The ribbon pieces need to exist spaced around the edge of the fabric and then that the small-scale looped sections hang off the edge of the material.
-
- The looped sections can be equally long or short every bit you lot would like, just as long as the sections lying on the textile are plenty so that the ribbons stay secure when sewn. The loops should exist pinned so that they stay in place while sewing.
- It's alright if the ribbons lay across each other because the toy will be turned correct side out and the tags will hang freely along the edge.
- Exist sure to attach the ribbons on the toy or blanket in places that volition not hinder the baby's ability to play with or recognize it.
- If you are adding teethers or whatsoever other toys, insert them into the ribbon loops earlier you pivot the loops downwardly.
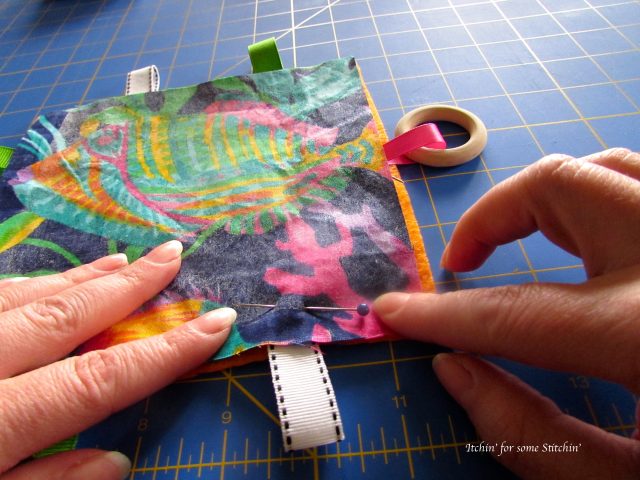
Place the other slice of material on top of the ribbon pieces. If it has a right and a wrong side, make sure you put the right side down. The right side is the side with the pattern.
-
- Marshal the edges of the 2 pieces of textile so that they can be sewn together properly.
- The two pieces of material need to be pinned together forth the edges. To do this, remove the pins and reattach them into all 3 layers: ribbons, and two fabric pieces.
Lay the plastic piece on top. Although one piece of the plastic handbag is enough, some people prefer to use more than one piece for an extra crinkly sound.
- Identify the plastic piece on top of the two pieces of fabric and ribbons.
- The plastic piece does not need to be entirely apartment considering it will become wrinkled when the infant plays with it. This wrinkling of the plastic is what volition make the crinkling sound.
- Remove the pins from the 3 layers and reattach the pins into all four layers: plastic, ribbons, and ii pieces of cloth.
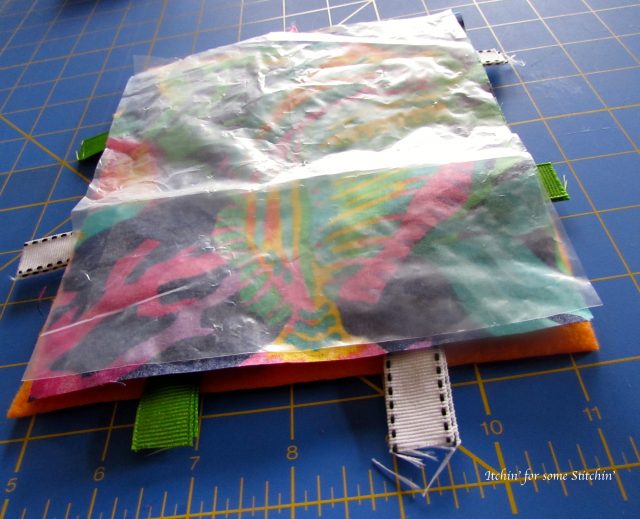
Annotation: You can besides layer the toy in the verbal contrary order as outlined here. Which way you choose to do information technology is entirely up to you.
Pace four Finishing.
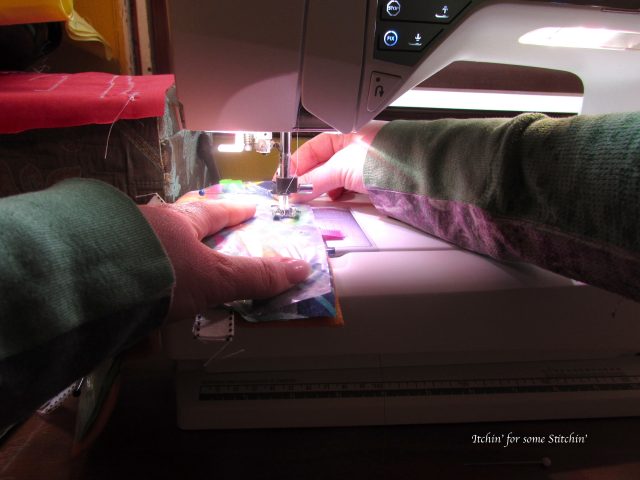
Sew the layers together, leaving a gap of 2 to three inches (5.1 to 7.vi cm) on ane side. Using a straight stitch on a sewing machine, sew all the way around the edge of the toy or blanket, but get out a gap of 2-3 inches unsewn.
-
- The plastic may arrive a little hard for the sewing machine to pull the toy through while sewing, so you might have to help guide it forth.
- Leave at to the lowest degree a ane/4-inch seam allowance along the edge to make sure your sewn seams are secure.
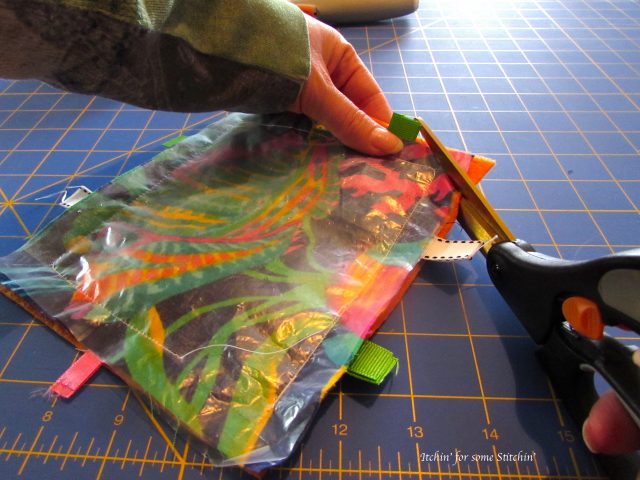
Turn the toy correct-side out.Afterwards trimming, pull the layers through the 2-three inch gap you left in step 3.
-
- Trim the edges as necessary. Remove an excess plastic, fabric, or thread that sticks out likewise far. Cut the corners at an angle. This makes it easier to pull the toy correct-side out through the opening.
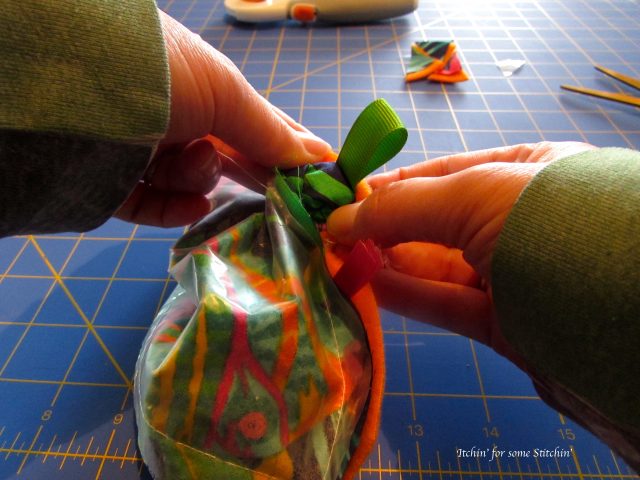
Securely mitt run up the opening closed.To make an invisible seam, use the ladder (likewise called the blind hem) stitch.
- If you don't know how to do this stitch, Stitch McCool has a great moving-picture show tutorial.
Double check the toy or blanket.In one case y'all are finished stitching, check the toy, especially the edges, for loose ends, threads, or hazardous materials before giving it to your baby to enjoy.
That's information technology! Yous're done!
Did you savour this post?
Please share!
Until next fourth dimension… Happy Sewing!

villarealmucatinter.blogspot.com
Source: https://itchinforsomestitchin.com/how-to-make-a-simple-diy-crinkle-taggie-toy/
0 Response to "How to Make the Crinkle in Baby Toys"
Post a Comment